How to Pack Dishes for Moving Without Breaking Them
- Before You Pack: Declutter and Plan the Timing
- Supplies for Packing Dishes
- How to Set Up a Dish Box
- How to Wrap Dishes for Moving
- How to Pack Plates for Moving: On Edge, Never Flat
- Bowls and Serving Dishes
- Cups, Mugs, and Glasses
- Knives, Flatware, and Small Pieces
- Fill the Gaps, Check the Weight, Label the Box
- Moving Day: Where Dish Boxes Ride
- How to Unpack Dishes Safely
- Common Mistakes That Break Dishes
- When to Hand the Kitchen to Professional Packers
- Frequently Asked Questions
When a plate arrives in pieces, people blame the road. I'd blame the box first. A plate that rode lying flat under five others, or a mug with room to slide every time the truck braked, never had much of a chance. Both problems get fixed at your kitchen counter. Learning how to pack dishes for moving comes down to four habits: wrap every piece on its own, stand plates on edge, load each box from heavy to light, and leave nothing inside free to move.
The method is the same for a move across town or across the country. A longer trip just calls for more padding.
Before You Pack: Declutter and Plan the Timing
Every dish you don't move is one less dish to wrap, carry, and unwrap, so start with the cabinets, not the boxes. Do you really need the chipped cereal bowls, a dozen mismatched mugs, or the fondue set that hasn't come out since it was a wedding gift? Donate or sell whatever you wouldn't buy again, and let the chipped pieces go.
Packing dishes for moving is slower than it looks, because every piece passes through your hands. Split it up:
- One to two weeks out: fine china, holiday platters, serving bowls, and the glasses kept for guests.
- Two or three days out: everyday plates, bowls, cups, and glasses.
- The last evening: an essentials box with a plate, bowl, mug, and utensils for each person, plus dish soap and a sponge. Mark it OPEN FIRST.
Photograph anything valuable or irreplaceable before it disappears into paper, existing chips included. Those photos are your best record if something arrives damaged.
Supplies for Packing Dishes
You don't need a cart full of specialty products. You need the right boxes and more paper than seems reasonable.
- Dish packs. Tall, heavy-duty boxes with thicker walls than a standard carton, sized for packing dishes in layers (some stores call them dish barrels). No dish packs? Use small or medium boxes in good condition, never large ones.
- Cell dividers. Cardboard inserts that give each glass or cup its own compartment. Liquor store boxes often have them built in.
- Packing paper. Plain, unprinted paper sold in bundles. Buy more than you think you need.
- Bubble wrap or foam sleeves for stemware, thin crystal, and anything with a delicate handle or spout. Kraft honeycomb wrap is a plastic-free alternative.
- Packing tape in a dispenser. Masking tape won't hold the bottom of a heavy box.
- A thick permanent marker.
Leave the newspaper out of it. The ink rubs off onto glaze and glass, and nobody wants to rewash a whole kitchen on move-in day.
How to Set Up a Dish Box
The bottom of a dish box does the hardest work: it carries all the weight and hits the floor first when a box gets set down too hard. Start there.
- Inspect the box. A reused box is fine if it's dry, square, and firm at the corners. A produce box that once got damp is not a dish box.
- Tape the bottom in an H. One strip along the center seam and one along each edge seam, then a second strip down the center. This will be one of the heaviest boxes you pack.
- Build a cushion. Crumple packing paper into a layer 2 to 3 inches deep. It should feel springy, not flat.
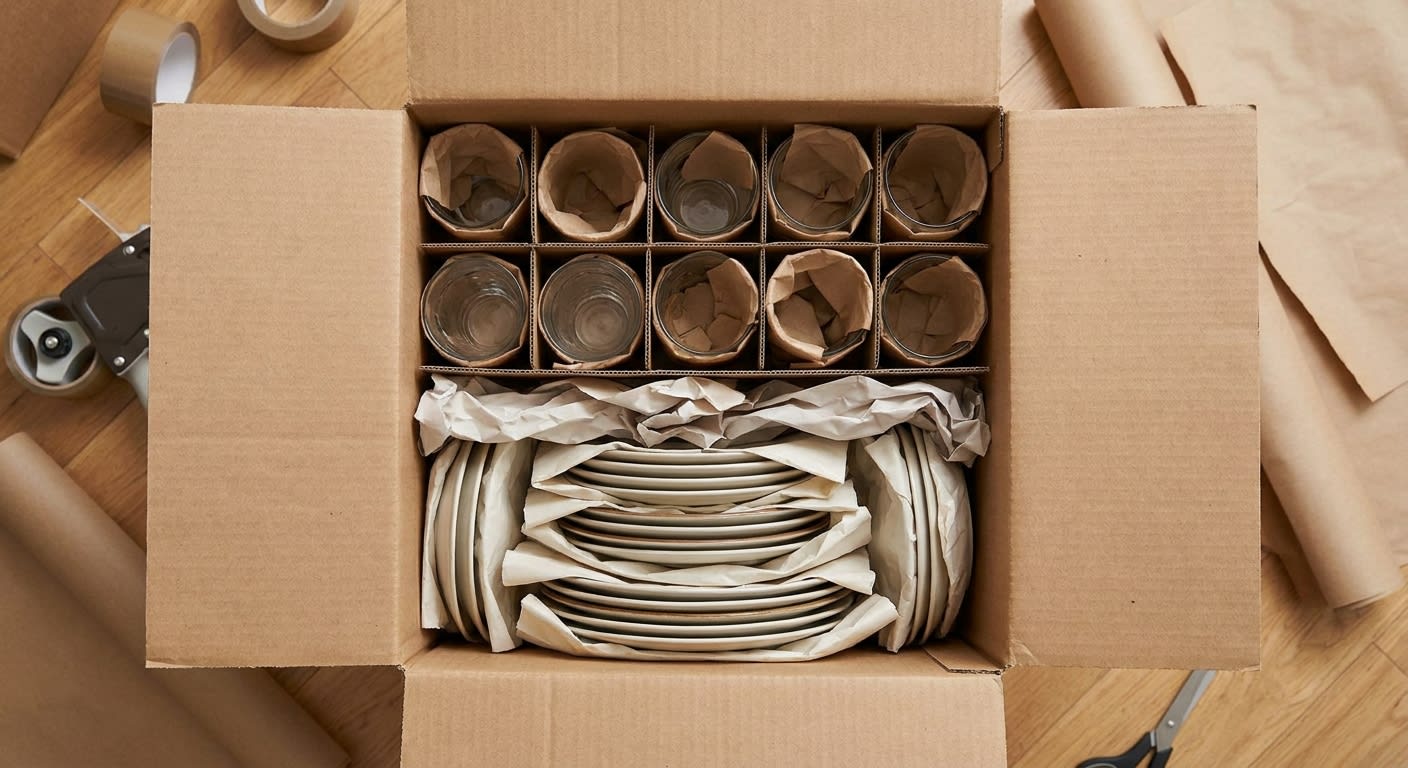
- Plan the layers. Plates and heavy serving dishes on the bottom, bowls in the middle, cups and glasses on top, with flattened cardboard or another inch of crumpled paper between layers.
How to Wrap Dishes for Moving
Nearly everything in your cabinets gets the same basic wrap. Work at a counter or table rather than on the floor; your back will thank you by the third box.
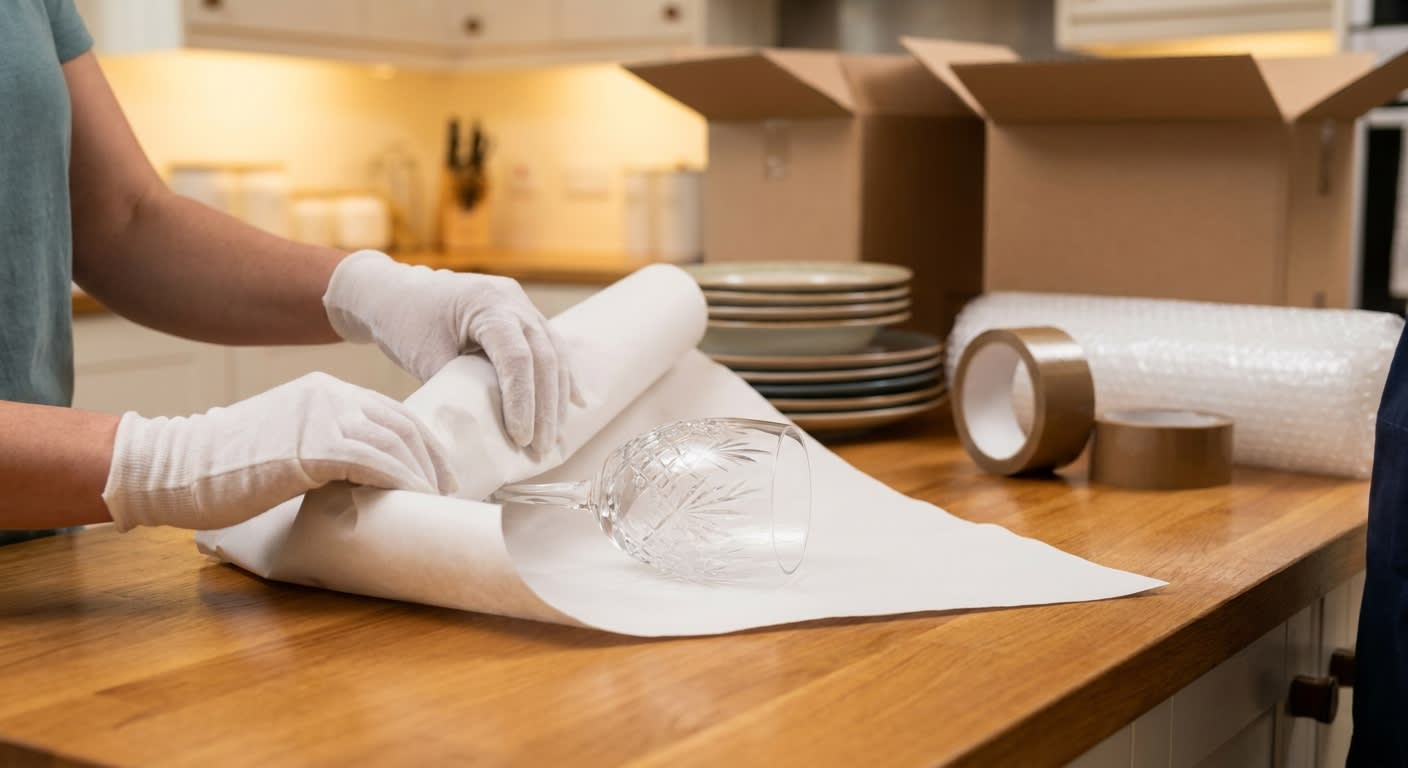
- Lay the dish in the center of a sheet of packing paper.
- Fold one corner over it, then the opposite corner, then the remaining two, until every surface is covered.
- Give thin, deep, or valuable pieces a second sheet. Two sheets is a good default for dinner plates.
- Tape the last corner so the wrap stays closed.
One rule applies to everything that follows: paper touches every surface, and no two pieces of ceramic or glass ever touch each other.
How to Pack Plates for Moving: On Edge, Never Flat
This step feels wrong the first time, because plates live in flat stacks in the cabinet. In a moving box, though, the bottom plate of a flat stack carries the weight of every plate above it, and each bump drives that weight into it again. Stand the same plate on its edge and the pressure runs along the rim instead of across the middle, which is how a plate holds up best. Think of records in a crate.
- Wrap each plate on its own.
- Bundle three or four wrapped plates of the same size in one more sheet. Bundles stand steadier and go in faster.
- Stand the bundles on edge in the bottom layer, largest plates first.
- Fit them snugly without forcing. If the last bundle takes pushing, the row is too tight.
- Stuff crumpled paper into the gaps along the walls so the row can't lean.
Salad plates and saucers go in the same way, in their own row or the next layer up. Platters stand on edge against the side walls.
Bowls and Serving Dishes
Shallow bowls pack like plates: wrapped, bundled, on edge. Deep bowls don't stand on edge well, and nested bare, one can wedge against the next. Wrap each one, nest two or three of the same size with a crumpled sheet between them, and wrap the stack as a bundle. Bundles go in the middle layer. I'd set them rim down, so the thicker base faces whatever sits on top.
Anything with a lid comes apart first: wrap the lid of a casserole dish, sugar bowl, or teapot separately and pack it beside its base, not on it. Give spouts and handles an extra twist of paper. Heavy baking dishes go in the bottom layer with the plates, never above glass.
Cups, Mugs, and Glasses
Cups and glasses always ride in the top layer, with the hollow inside stuffed and anything that sticks out padded first.
Mugs and teacups
The handle is the easiest part to snap. Wrap it first with a strip of paper or bubble wrap, stuff a crumpled sheet inside, then wrap the whole mug and tuck the ends into the opening. Stand mugs upright with the handles facing the same way so they can't hook into each other. Saucers go with the plates.
Everyday glasses
Fill each glass with crumpled paper so its walls have support, roll it diagonally in a sheet or two, and fold the ends into the opening. Stand it upright in a cell divider. Don't nest glasses, even wrapped: they can wedge together and crack when you pull them apart.
Stemware
Stuff the bowl as usual, then give the stem, the thinnest point, its own strip of paper or bubble wrap before wrapping the whole glass. One glass per divider cell, crumpled paper on top. Packers disagree about rim up or rim down; I'd go foot down, since the foot is built to carry the glass's weight and the rim isn't. Crystal or a set you can't replace deserves double-boxing: a small divided box set inside a larger one with a few inches of crumpled paper on every side.
Knives, Flatware, and Small Pieces
Knives
Knives aren't fragile, but they're the one thing in a kitchen box that can hurt the person unpacking it. Wrap each blade in several layers of paper or a sleeve of folded cardboard, tape it closed, and pack knives together in a small box with the blades pointing the same way. Write SHARP KNIVES on the top and sides. The knife block travels empty, wrapped on its own.
Flatware and odds and ends
Flatware can stay in its organizer tray: cover it with paper, wrap the tray, and tape it. Loose bits like chopsticks or measuring spoons go in a zip-top bag. Small lids, ramekins, and saucers are easy to lose in used paper, so bundle them with the dishes they belong to.
Fill the Gaps, Check the Weight, Label the Box
A perfectly wrapped plate can still break in a box with empty space. Fill every opening with crumpled paper, add a final cushion layer, and close the flaps. They should close flat, with no bulge and no dip.
Then test it: lift the box a few inches and tilt it gently side to side. If anything shifts, open it and add paper. It takes thirty seconds, and I'd never skip it.
Check the weight while it's in your hands. Move.org's dish-packing guide suggests keeping each box under 40 to 50 pounds, and a box of plates can get there before it's full. If it already feels heavy, top it off with paper instead of another bundle.
Label every dish box on the top and at least two sides, since the top disappears once boxes are stacked: FRAGILE and DISHES in large letters, arrows or THIS SIDE UP, the room, and a short list of contents. Labeling a whole house? Here's our guide on how to label moving boxes.
Moving Day: Where Dish Boxes Ride
Careful packing can still come undone in the last hundred feet, especially when the building books elevator time or the truck has to park down the block.
- Move dish boxes early in a reserved elevator window, not in the scramble at the end.
- Keep dolly stacks short. Two dish boxes on a hand truck is plenty. On stairs, carry them by hand.
- Load them low. Dish boxes go on the truck floor against a wall, with nothing heavier on top. One box of books on a dish pack can undo an evening of wrapping.
- Keep irreplaceable pieces with you. If the heirloom china fits in your car, let it ride there.
Then there's the drive. Stop-and-go freeway traffic, familiar to anyone who drives in LA or Orange County, means constant braking, and every stop nudges the load. That's why filling the gaps matters as much as the wrapping.
How to Unpack Dishes Safely
Unpack the kitchen early, before other boxes get stacked on the dish packs, and go one piece at a time.
- Work over a padded surface, like a folded towel on the counter.
- Unwrap each item above the open box, so anything that slips lands in paper, not on tile.
- Shake out every sheet before it goes into recycling. Saucers and small lids hide in there.
- Check each piece for chips as it comes out. If something is damaged, keep it with its wrapping and take photos.
If the new kitchen is in Southern California, it's in earthquake country, and empty cabinets are the easiest ones to set up well. The Earthquake Country Alliance recommends moving heavy items to the floor or low shelves and installing latches on kitchen cabinets. So put stoneware and serving bowls on the lower shelves, keep glasses within easy reach rather than up top, and add latches before the good dishes go back in.
Common Mistakes That Break Dishes
- Stacking plates flat instead of standing them on edge.
- Using large boxes. Dishes are dense, and a big box gets too heavy to carry safely long before it's full.
- Wrapping in towels or T-shirts. Fabric bunches and shifts, leaving thin spots.
- Leaving empty space. If a box rattles, something in it is moving.
- Mixing cookware with glass. Pots, pans, and cast iron get their own box.
- Packing damp dishes. Wet paper goes limp and stops cushioning.
- Rushing the unpack. That's how a saucer ends up in the recycling bin.
If you only remember one thing about how to pack dishes for moving, make it the tilt test. A box that stays quiet when you tip it is ready to go.
When to Hand the Kitchen to Professional Packers
Packing everyday dishes yourself is completely reasonable. It stops making sense when:
- you own fine china, crystal, or heirloom pieces you couldn't replace;
- the move is days away and the kitchen hasn't been started;
- stairs, a long carry, or a bad back make heavy dish boxes a real risk.
It doesn't have to be all or nothing. Green Moving's packing and unpacking service includes partial packing, where the crew packs only the fragile and valuable items and you handle the rest, plus unpacking at your new home. Packing on your own? Dish packs, packing paper, and bubble wrap can be added to your move; current rates are on the pricing page.
Frequently Asked Questions
What's the best way to pack dishes for moving?
Wrap every piece in packing paper, stand plates on edge in a dish pack or small box, and load from heavy to light: plates at the bottom, bowls in the middle, cups and glasses on top. Fill every gap with crumpled paper and label the box FRAGILE on several sides. If it stays quiet when you tilt it, it's ready.
Should plates be packed flat or on their edge?
On their edge. In a flat stack, the bottom plates carry the weight of everything above them, and every bump adds to it. On edge, a plate takes that pressure along its rim, where it holds up far better.
Can I wrap dishes in towels or clothes instead of packing paper?
For plates and glasses, it's not a good trade. Fabric bunches and shifts during the drive, leaving thin spots right where a dish needs padding. Towels work as a top layer or extra filler, but wrap the dishes themselves in paper.
Do I really need dish pack boxes?
Not strictly, but they make the job safer. A dish pack has thicker walls than a regular box and is tall enough to pack in layers. Small or medium boxes in good shape also work if you cushion them well; large boxes get too heavy.
Can plates and glasses go in the same box?
Yes, if the layers are in the right order. Plates go on edge at the bottom, cardboard or crumpled paper goes over them, and cups or glasses go on top, ideally in a cell divider. Never the other way around.
How do you pack pots and pans for moving?
In their own box, not with dishes. Nest them with a sheet of paper between pieces, wrap glass lids separately, and fill the gaps so nothing rattles. Our guide on how to pack a kitchen for moving covers cookware, small appliances, and the pantry.